DO NOT OPERATE, THE MACGREGOR 26 WITHOUT MAKING SURE THAT THE WATER BALLAST TANK IS COMPLETELY FULL.
Unless the water ballast tank is completely full, with 1200 pounds of water ballast, the sailboat is not self righting. Without the water ballast, the boat will not return to an upright position if the boat is tipped more than 60 degrees, and will capsize like most non-ballasted sailboats. Always, before operating the boat, remove the 1" diameter vent plug located in the compartment under the cabin access ladder, and use your finger to make sure that the water level is no more than 3" below the hole from which the plug was removed. Then reinstall the plug.
MAKE SURE THE TANK VALVE NUT AND THE PLUG ARE SECURE AND TIGHT BEFORE OPERATING THE BOAT.
If the valve is not tight, water will run out of the ballast tank if the boat tips excessively, and self righting stability will be lost. If the 1" plug is not secure, the ballast water will spill out into the boat if the boat tips.
DO NOT ALLOW ANY PART OF THE BOAT, TRAILER, MAST OR RIGGING TO COME IN CONTACT WITH ANY SOURCE OF ELECTRICAL POWER.
If your mast or any part of your boat or rigging comes in contact with a power line, you could be killed or injured. Don't sail your boat into a power line. Don't step your mast into a power line, or don't move your boat, on its trailer, into a power line. Masts, wire shrouds, or wet fiberglass are good conductors of electricity and can carry current directly to you. Look up and make sure you will be clear of sources of power before doing anything with your boat. Don't remove the warning decal from your mast. It may help you remember to look and avoid a major calamity.
If you are caught in an electrical storm, don't touch anything that is metal, including the mast, shrouds, -.boom, lifelines, rudder, tiller or metal hardware. If possible, don't touch anything that is wet. Many experts recommend that a heavy gauge copper wire be securely fastened to one of the shrouds and allowed to hang in the water to carry off the electricity from a lightning strike.
MAKE SURE THAT YOU TOW YOUR BOAT WITH A LARGE ENOUGH CAR. CHECK WITH YOUR CAR MANUFACTURER OR DEALER TO DETERMINE IF THE WEIGHT OF THE BOAT AND TRAILER IS WITHIN YOUR CARS TOWING CAPACITY.
LOAD YOUR BOAT SO THE WEIGHT ON THE TRAILER HITCH IS BETWEEN 160 AND 190 POUNDS.
If the weight is less, the trailer will tend to swerve dangerously from side to side. If the weight is more, an excessive load will be placed on the rear end of your car, and the trailer will be very difficult to hitch or unhitch. To protect your back when removing the trailer from the car, use a hitch jack or have an adult hang on the back of the boat to take some weight off the tongue.
NEVER LOAD THE BOAT AND TRAILER MORE THAN THE AMOUNT SHOWN ON THE CERTIFICATION DECAL NEAR THE HITCH, ON THE LEFT (PORT) SIDE OF YOUR TRAILER (2750 POUNDS).
Remember, the maximum gross vehicle weight (G.V.W.R.) includes the weight of the trailer as well as the weight of the boat and all gear in the boat. You may not deduct the weight that is carried on the hitch of the car in arriving at the G.V.W.R. Check your state law to determine if there are any other weight or braking requirements that must be met.
DO NOT TRAILER THE BOAT WITH ANY WATER IN THE BALLAST TANK. THE 1200 POUNDS OF WATER WILL SEVERELY OVERLOAD THE TRAILER AND THE CAR.
Open the valve and drain the tank completely before trailering.
SECURE THE POP TOP IN THE DOWN POSITION AND CLAMP THE FOREDECK HATCH SHUT IN ALL BUT THE MOST GENTLE OF WINDS.
Strong gusts can unexpectedly cause the boat to lean excessively, possibly allowing water to enter the hatch and flood the boat. Unsecured hatches can be blown shut, and may injure someone on board.
NEVER ALLOW THE TOP OF THE CENTERBOARD TO GO BELOW THE LEVEL OF THE WATER.
When the centerboard is full down, the top of the board should never be covered with water. We have provided a rope on the centerboard that ties, with a knot in its extreme end, to a small pad eye on the deck. This is a preventer, and should be attached at all times. Adjust the knot so that the top of the board is just above the water level when the board is fully down.
BATTERIES ARE DANGEROUS. TREAT THEM CAUTIOUSLY.
Batteries can produce explosive gas, corrosive acid and levels of electrical current high enough to cause burns. Always wear eye protection or shield your eyes when working near any battery and remove all metal rings and jewelry. Never expose a battery to open flames or sparks. Do not smoke near a battery. It could blow up. Do not allow battery acid to contact eyes, skin, fabrics or painted surfaces. Flush any contacted area with water immediately and thoroughly. Get medical help if eyes are affected. Do not charge the battery, adjust post connections or use booster cables without making sure the battery compartment is properly ventilated. When charging the battery, carefully follow the instructions on the charger. Keep the battery filled to the proper level with distilled water. Always keep vent caps tight. Do not allow metal tools or metal parts to contact the positive (+) terminal and the negative (-) terminal or any metal connected to these terminals.
MAKE SURE THE WHEEL LUG NUTS ARE TIGHT BEFORE TRAILERING THE BOAT.
MAKE SURE THE OUTBOARD MOTOR AND MAST ARE ATTACHED FIRMLY TO THE BOAT WHEN THE BOAT IS BEING TRAILERED.
Put an extra cable on the outboard and make sure the clamps are tight. Having it bounce off onto a busy street could be lethal. The mast should be bolted to the bow pulpit and properly secured at the rear (wood) mast carrier. Just tying the mast is not enough. Unless it is bolted, with a lock nut that won't vibrate loose, it could shoot forward and do some real damage if the car stops quickly.
DON'T STORE FUEL CANS INSIDE THE BOAT,
Gas fumes are explosive. Keep all gasoline containers out of the boat and on deck.
DO NOT REMOVE ANY OF THE FOAM FLOTATION BLOCKS, OR LEAVE THE HATCH ON THE FRONT BUNK UNSCREWED.
Loss of any of the foam could seriously impair the ability of the boat to stay afloat in the event of damage.
IF THE CABIN OF THE BOAT IS ENTIRELY FILLED WITH WATER, AND THE BOAT IS DEPENDENT ON THE FOAM FLOTATION TO KEEP IT AFLOAT, IT WILL BE VERY UNSTABLE, AND MAY TURN UPSIDE DOWN.
WHEN RAISING AND LOWERING THE MAST, DON'T STAND ANYWHERE WHERE THE MAST OR SUPPORT WIRES COULD FALL ON YOU IF SOMETHING, OR SOMEONE, LETS GO.
BEFORE TRAILERING THE BOAT, MAKE SURE THE NOSE OF THE BOAT IS TIED SECURELY TO THE TRAILER.
The rope that secures the boat to the trailer should be tied to the stainless eye on the nose of the boat (using a bowline knot) and to the winch drum. The winch should be cranked tight, pulling the nose firmly into the rubber block on the trailer. Make sure the winch latch is secure to keep it from unwinding. Don't release the line until the boat is in the water.
BE EXCEEDINGLY CAREFUL WHEN SAILING IN HIGH WINDS, LEARN BASIC SEAMANSHIP.
The Coast Guard Auxiliary Power Squadrons offer excellent courses at low cost. This is an excellent investment.
ALWAYS SHUT OFF THE OUTBOARD MOTOR WHEN THE BOAT IS NEAR PEOPLE IN THE WATER. EVEN ON LOW HORSEPOWER MOTORS, THE PROPELLER CAN DO SERIOUS DAMAGE
NEVER MOVE THE BOAT ON OR OFF THE TRAILER WITHOUT MAKING SURE THAT THE WATER BALLAST TANK VALVE IS CLOSED,
When the valve is open, it hangs several inches below the bottom of the boat. It can hang up on the trailer as the boat goes on or off, causing damage to the valve or to the hull. Make sure it is closed tight as the boat is launched or recovered.
EVERY TIME YOU LAUNCH THE BOAT, MAKE SURE THAT THE WATER BALLAST VALVE IS FLUSH AGAINST THE BOTTOM OF THE HULL. THAT THE RUBBER SEAL IS CLEAN AND IN GOOD SHAPE, AND THAT THE HULL UNDERNEATH THE RUBBER SEAL IS CLEAN,
The valve must seat perfectly against the hull to prevent leakage and loss of water ballast. Don't leave it open when the boat is in the water. Marine growth might get in between the valve face and the hull, allowing leakage. Frequently check the valve for damage.
TERMINOLOGY:
In the following instructions, we have tried to avoid the use of nautical terms wherever possible. If you are new to the sport, having to learn a new language while you are learning to rig and sail the boat can be grim. If you are an experienced sailor, be patient with our use of non-nautical words, rather than the more technically correct sailing language.
JOBS THAT ONLY HAVE TO BE DONE ONCE:
Much of what you will read in the following instructions involves the initial setup and rigging of the boat, and will only have to be done once. For example, you will find detailed information on rigging the mast and connecting the mast support wires and lines to the mast. Once this is done, it will not have to be redone each time you sail. So don't be intimidated by the length and detail of these instructions.
TOOLS:
You will need two 9/16 end wrenches, two 11/16 end wrenches and a pair of pliers to do all of the assembly work. You can get by with the pliers and a small crescent wrench.
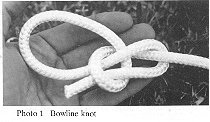
BOWLINE KNOTS:
It is essential to learn to tie a bowline knot. It is used all over the boat to tie stuff together. It is shown in Photo 1. Pull the loops tight. It will not jiggle loose, and can be easily undone even after being pulled tight under really heavy loads.
First, take a look at the photographs on the following pages to get a general idea of what the complete mast and rig will look like.
RIG BOX:
Open up the box of rigging that comes with the boat and do a complete inventory to make sure everything is there. A checklist, showing each item, is packed with the parts.
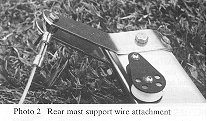
REAR MAST SUPPORT WIRES:
Lay the mast on the ground. Start at the top and install the rear mast support wire (31' 4 1/2") to the stainless fitting at the top of the mast as shown in Photo 2. Note that the end with the stainless steel strap does not go on the mast. Use a 1/4" x 1 1/2" bolt and lock nut. Run the nut down as far as it will go.
Install the top side wires (2 ea, 22' 9 1/2") at the 3/8" hole located 6' from the top of the mast. Use a 3/8" x 4" bolt and lock nut. A pair of 1" x 6" stainless steel straps also mounts on the bolt. The entire assembly is shown in Photo 3.
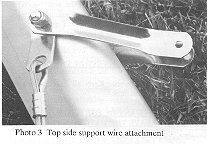
Make sure the 1" x 6" stainless steel straps are mounted with the rounded center surface of the straps contacting the mast (see Photo 3). The side edges of the straps should point away from the mast. If the straps are mounted wrong side out, the edges of the tangs may cut into the mast. Note that the straps are outside of the fittings on the end of the wire. Note also that the straps slope toward the front of the mast, and not toward the rear of the mast (the side with the sail feed slot). Tighten the nut tight, but not tight enough to deform the mast or fittings. Use the locknut that is provided.
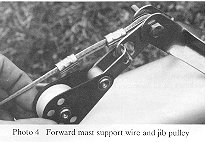
FORWARD SUPPORT WIRE:
The forward support wire (23' 3/4") is attached to the bottom end of the 1" x 6" stainless straps with a 1/4" x 2" bolt and lock nut as shown in the Photo 4. Note that a pulley is mounted on the same bolt. This pulley is used for the rope that hoists the forward sail. Use a lock nut and run it down tight.
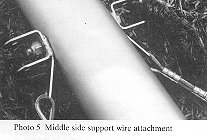
MIDDLE SIDE SUPPORT WIRES:
The middle side wires (2 ea, 11' 11 1/2") and spreader U brackets mount to the 3/8" hole through the mast located 11' from the bottom of the mast. The assembly is shown in Photo 5. Use a 3/8" x 4" bolt and lock nut. Tighten the nut tight but not so tight as to deform the mast. The straps that are attached to the U brackets should point about 10 degrees to the rear of the mast.
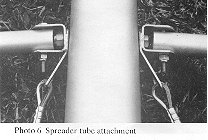
SPREADER TUBES:
Connect the spreader tubes to the U shaped brackets as shown in Photo 6, using 1/4" x 2" bolts and lock nuts. The nuts go toward the bottom end of the mast. Run the nuts down just snug enough so that the spreaders can pivot around the bolt with a slight amount of friction.
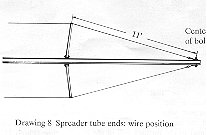
Connect the spreader tubes to upper mast support wires as shown in Photo 7.

The end of the spreader tubes should be located as shown in Drawing 8. The measurement should be taken with the wire pulled tight. Make sure the spreader end fittings are clamped securely to the upper wires. Don't tighten the small screws too tight or the plastic tips may strip.
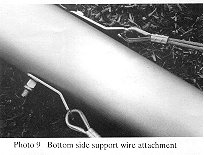
BOTTOM SIDE SUPPORT WIRES:
The bottom side support wires (2 ea, 5' 2") mount to the 3/8" hole 6' from the bottom of the mast as shown in Photo 9. Use a 3/8" x 4" stainless bolt and lock nut. These wires keep the mast from falling sideways when it is being raised.
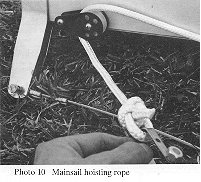
MAINSAIL HOISTING ROPE:
The rope that hoists the rear (main) sail passes through the pulley at the masthead (Photo 10) and the forward end ties off to the cleat on the right side of the mast (right when looking forward). Use a bowline knot and tie a twist pin U shackle to the aft end of the hoisting line (the end nearest the sail feed track)
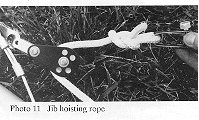
JIB HOISTING ROPE:
The rope that hoists the forward jib sail passes through the pulley near the top of the forward mast support wire and ties off to the cleat on the left side of the mast. Tie a twist pin U shackle (with a bowline knot) to the forward end of the hoisting rope (Photo 11).
SECURING THE MAST TO THE BOAT:
The mast is carried on the boat with the bottom end forward and the slotted side down. Bolt the mast step to the forward rail with a 1/4" x 4 1/2" bolt and lock nut, as shown in Photo 12. Make sure the nut is tight. Use locknuts on all hardware holding the mast to the boat.

Never remove the 3/8" x 4" bolt and nut that holds the top half of the hinge to the mast. This part of the hinge always stays on the mast. Make sure the 4 1/2" bolt is tight. Use the 9/16 wrenches. You will not believe the chaos if the front end of the mast gets loose while you are trailering. If you just tie the mast to the bow rail, a sudden stop could catapult the mast into your car or even into the car ahead of you. Again, the bolt is better than rope. Extra rope tie downs are always a good precaution.
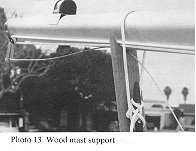
The wood mast support slips into the brackets at the rear of the cockpit. A thumb screw in the bracket is tightened into the wood to keep the wood from jumping out. Tie the mast securely into the V notch in the top of the wood support.(Photo 13).
A 6' long piece of 5/16" line secures the center of the mast to the mast hinge to keep the center of the mast from bouncing while the boat is being towed.
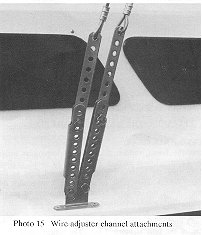
WIRE ADJUSTING CHANNELS:
Attach a wire adjuster channel to the bottom end of the top, middle and bottom mast support wires, and to the Photo 15 Wire adjuster channel attachments rear mast support wire. (Photo 14)
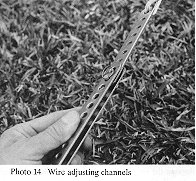
Use a 1/4" clevis pin and cotter ring, and mount them exactly as shown in the Photo 14. Put the clevis pin through the second hole down on the channel and thru the end hole in the slide.
Connect the wire adjuster channels to the deck straps with 1/4" clevis pins and cotter rings. The top and middle mast support wires attach as shown in Photo 15.Note that the open side of the adjusters face each other.
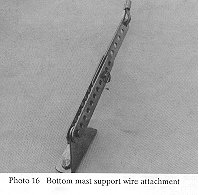
The bottom mast support wires attach as shown in photo 16.
Connect the rear mast support wire to the deck strap at the rear of the boat in exactly the same manner as the side wires.
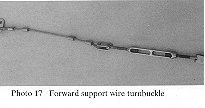
FORWARD SUPPORT WIRE TURNBUCKLE:
Attach a turnbuckle to the forward mast support wire as shown in Photo 17. Adjust the turnbuckle so that it is 1/3 closed.
SECURE ALL GEAR:
Stow the boom, rudder, tiller and all loose gear inside the cabin. Leave enough separation to avoid chafing. Make sure the outboard motor is clamped tight to the boat. Add a safety cable to make sure it stays with the boat. Most motors have holes in the bracket to permit bolting the bracket to the boat. This is a good idea.
Don't load up the cockpit with gear and people unless the rear of the boat is blocked up. The weight could cause the trailer and boat to tip backwards.
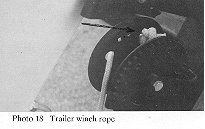
Secure the trailer winch rope to the trailer winch, as shown in Photo 18, and secure the other end to the bow eye with a bowline knot.
As an extra security measure, tie a line to one of the trailer side rails near the rear end of the trailer. Pass the line across the boat, between the cockpit rails and the deck. Pull it tight, and tie it to the other trailer rail.
Carefully store and secure all lines and mast support wires to avoid entanglement in the trailer wheels while towing.
LUG NUTS:
It is the owners responsibility to check the lug nuts that secure the wheels to the axle before using the trailer. The wheels may have been removed in order to ship the boat to you or your dealer, and it is important for you to check to see that the lug nuts have been properly tightened. If they are loose, you may lose a wheel, with serious consequences. They should be TIGHT. The proper setting, using a torque wrench, is 90 to 95 foot pounds. Don't move the trailer one foot before checking these nuts.
TIRE REGISTRATION:
It is a federal law that the first licensed purchaser of any vehicle with tires register the tires with the vehicle manufacturer. This is done by completing the Tire Registration data on your warrantee card and returning it to MacGregor. Your name, address, tire serial numbers, trailer serial number and date of purchase must appear on this card.
TIRE PRESSURE:
Before using the trailer, check the tire pressure. The recommended pressure can be found on the decal located on the left front side of the trailer, or on the sidewall of the tire near the tire size. Always check the tire pressure when the tires are cold. Under inflation can cause excessive sway at certain speeds and could cause loss of vehicle control. Over inflation could cause a tire to blow out, which also is very dangerous. Check tire pressure at frequent, regular intervals.
HITCHING UP:
Place the trailer coupler over the ball on your car, and make sure the snap latch is all the way down and locked. Try to lift the trailer off the ball to make sure the hitch is securely fastened to the ball. Insert a 1/4 x 1 1/2" bolt and lock nut thru the locking hole in the tongue to make sure the trailer doesn't jump off. Tongue weight should be between 160 and 190 pounds.
The ball should be 2" in diameter. You are responsible for making sure that the trailer hitch ball is secured properly to your car. Get some qualified help in mounting the hitch to the solid structure of your vehicle.
SAFETY CHAIN:
Secure the safety chain to a solid bumper brace or through the hole normally provided in your hitch. Leave enough slack so that the trailer and car may turn without putting tension on the chain. Secure the end of the chain to itself with the locking device mounted on the end of the chain. This must be a solid connection.
TOTAL WEIGHT:
The weight of the boat, trailer and all other items cannot exceed 2750 pounds. The empty boat weighs 1675 pounds. The trailer weighs 525 pounds. All other gear cannot exceed 550 pounds.
LIGHT WIRES:
Our trailers come with a trunk harness (you will find it plugged into the trailer harness near the hitch). The exposed ends of the trunk harness must be wired into the light wiring of your car. The other end should be plugged into the trailer wiring harness. The wires on the trunk harness and trailer wiring are color coded as follows:
White Ground
Brown - Running lights or tail lights
Yellow - Left turn signal and brake light
Green - Right turn signal and brake light
Make sure you have a good ground or you won't have lights. The light mounting brackets and ground wire must contact metal (you may have to scratch through the paint). Don't use the trailer unless all lights are working. You must have the following:
1 red tail light at each rear corner of the trailer.
1 red clearance light mounted on the side of each tail light.
1 clear license plate illuminator.
1 amber clearance light mounted at the outboard rear corner of each
fender. (These must be visible from the front.)
You must have 2 red lights at the extreme rear end of the load (normally on the end of the mast). During the day, a red flag may be used. Here again, check your state laws for this and other requirements that you have to meet.
If your trailer has brakes, make sure the ground wire is connected to the trailer frame, and not to the moving portion of the brake actuator.
HYDRAULIC (SURGE) BRAKES:
State laws concerning brakes vary. Check with your dealer or with your appropriate state agency to determine whether or not trailer brakes are required in your area.
If your trailer is equipped with brakes, read the following carefully to make sure you understand their operation.
When you apply your car brakes, the trailer will try to push forward against the car. This push compresses the actuator mounted as part of the hitch, which applies force to the master cylinder, which creates hydraulic pressure to operate the trailer brakes. The harder you stop, the more hydraulic pressure you generate, and the more forcefully the brakes will be applied. The safety chain must be loose enough to permit free motion of the actuator assembly.
BREAKAWAY CHAIN:
The surge brake system has a breakaway chain that connects to the car (this is not the same as the safety chain mentioned above). If the trailer gets loose from the car, the breakaway chain will cause the brakes to engage and try to stop the trailer. Make sure that this chain is fastened securely to the tow vehicle. It should have some slack so that it will not engage the brakes while the trailer is still connected to the car. The chain should be loose enough, even during turns, so that the breakaway lever is released (pointing all the way to the rear of the trailer) while the car and trailer are engaged. Check this each time before you use the trailer. No teeth on the breakaway lever should be engaged in the leaf spring. Accidental application of the lever will cause the trailer brakes to engage, drag, heat up and perhaps burn out. Do not use the emergency breakaway system as a parking brake.
ACTUATOR OPERATION:
The actuator linkage and the sliding mechanisms should work freely through the full range of travel. Do not mistake shock absorber resistance in the system for binding. Nylon bearings and the plated shafts do not normally need lubrication, but should be checked periodically. If you encounter erratic or unusual braking performance, investigate the cause immediately. The trailer should not push the tow vehicle, or try to jackknife during stops. The brakes should release when the trailer is pulled from a dead stop. To be sure the brakes are releasing properly, pull gently from a dead stop and then slowly stop so that the actuator ends up in a fully extended position. Then, with the vehicle stopped, tap each brake drum with a metal object. The brake drums should ring clearly when the brakes are released.